Set up your Canon PIXMA MP495/499 to use WiFi
or "The 'only the power-cord'-goal" Sat 08 April 2017Even if I doubt you'd ever be able to buy this Canon printer/scanner now (I bought it 6 years ago), maybe this tutorial could help you set up your MP495/499 to connect to your personal WiFi and get the scanner and printer to work wirelessly in Linux. To be fully honest with you, I'm only writting this so I can have a straightforward tutorial next time I need to set it up again since I've had to set it up already 5 times and I always spend too much time to find out how to do it.
Configure your printer's WiFi settings
The MP495 WiFi settings are set up from a webpage on the printer itself. For that, you need to access it wirelessly (don't you see the irony here?). The MP495 is expecting a Wireless Network with the following "features":
- SSID:
BJNPSETUP - No password
- DHCP server activated
The printer will now automatically connect to the WiFi network once the WiFi has been activated. To do so, power up your MP495 and wait for it to initialize.
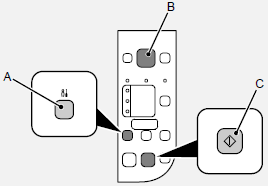
Once it's done its whole init process, press the Maintenance button (A) until the 7-segment display (B) shows something looking like the letter G. Then press the Color button (C). Wait a few seconds and the WiFi logo on the front panel should light up.

Find out the IP address of your printer by going on the webpage of your Access Point or connect your computer to the BJNPSETUP network and run nmap -sP 192.168.1.0/24 (192.168.1.0/24 being the network on which you are when connected to BJNPSETUP). This should return three IPs: the AP's, yours and your printer's.
Enter the IP address of your printer in your web browser. You'll be greeted by a page, you'll click Advanced, you'll note the Network Printer Name, and then click Network Settings.
Select Use wireless LAN and enter the SSID of the network you want your printer to connect to. Click on Modify next to the Encryption Method label. In the opened page, set up the settings of your WiFi network.
Then click save. Of course, you'll lose the connection to your printer since it is now expecting another WiFi network. So go back to your AP and set it back up to what it was before you modified it.
Now, you'll certainly want your printer to have the same IP address for ever so you don't have to reconfigure your printing and scanning tools on your computer. Either you do that in the Network Settings of your printer or on your AP (if it supports it) by giving it a static DHCP lease. I recommend the latter.
Check on your AP or with your computer that the printer is connected on your WiFi network (and get its IP address thanks to the Network Printer Name you noted earlier).
Configure printer on Linux
Then you can configure your printer with the tools available in your distro. On Xubuntu, open system-config-printer and click on Add and select Find Network Printer in the Network Printer dropdown menu. Enter the IP address of your printer and once it's been found, click Forward.
It'll first look for drivers and then ask you which one you want. Select Canon and then either PIXMA MP495 or PIXMA MP499 depending on which one you got. Print a test page to be sure your printer is well configured.
Configure scanner on Linux
XSane and simple-scan are broken right now on Xubuntu for the MP495 (16.10 at the moment of article redacting) so most people will tell you to install the driver from Canon. I had really a hard time to install it and I generally avoid using vendor's drivers. So after searching a bit, I found out that XSane had its support for the MP495 broken only if libsane library's version is 1.0.25 (which it was on my system). After adding some repo and updating libsane, I could scan over WiFi.
sudo add-apt-repository ppa:rolfbensch/sane-git
sudo apt-get update
sudo apt-get upgrade
Factory reset the printer
If for any reason you misconfigured your printer, factory reset it by pressing the Maintenance button until you see the small letter t on the 7-segment display and then press on the Color button.
Disable WiFi on MP495
Press the Maintenance button until you see the letter G and then press the Black button (on the left of the Color button).
 Quentin Schulz